

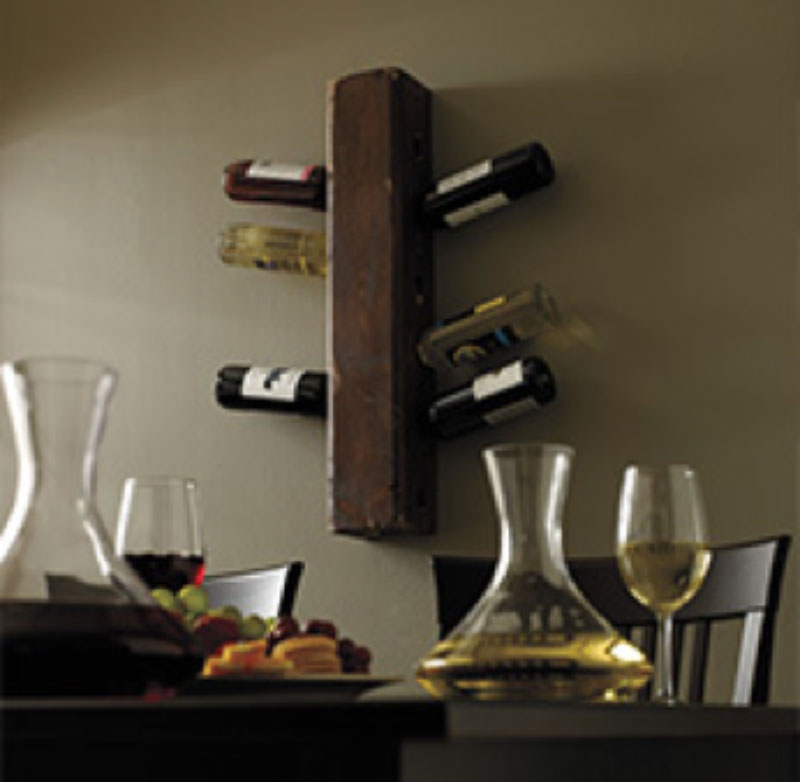
This rustic wall mounted wine rack will display your favourite vintages with grandeur
by Rob Brown
This rustic wall mounted wine rack will display your favourite vintages with grandeur. The distressed wood finish makes it look perfectly aged like the fine wine it houses. Simple, yet sophisticated.
What you'll need …
Tools…
- tape measure 1048-330
- table saw 1346-634
- planer 1332-533
- hammer 1030-665
- clamps 1022-478/481/654, 1023-261
- drill 1239-210
- drill press table 1334-602
- 11/4" spade bit 1214-206
- router 1258-515
- screwdriver 1058-169
Materials…
- 2" x 6" x 8' spruce lumber
- Gorilla glue 2020-823
- finishing nails 2134-014
- sandpaper 1061, 1078
- #9 x 21/2" flat head brown deck screws 2183-417
- SamaN Stain Kit 1656-372
- SamaN Latex Wood Stain - Prune 1871-513
- interior finish 1878-944
- paint brush 1613-695
Here's how…
- Break out one 37" long piece (front) and two 291/2" long pieces (sides) from a dry 2" x 6" x 8'.
- FRONT: Dress the 37" long piece to final thickness and width then cut it to final length. The offcut will be used as a cleat to mount the rack to the wall.
- SIDES: Dress the two sides to final dimensions.
- Glue the sides to the front. Keep the sides flush with the outside edge of the front piece. A couple of finishing nails will keep the pieces positioned during glue-up and should be removed once the glue dries. (Photo 1)

Photo 1 Attach the sides
With some glue and a few clamps, adhere the sides to the face. Notice the finishing nail in the front of the face; it helps position the parts for clamping and is later removed. - Machine the cleat so it fits snugly between the two sides. The cleat will be screwed to the wall and the rack will be screwed to the cleat. (See photo above)
- Drill one screw clearance hole in either side of the rack to attach it to the cleat.
- Lay out the wine bottle holes on both sides. Stagger the holes so the wine bottles don't touch each other. The centre of the holes should be 2" from the back edge of the rack. On the left side of the rack, place the centre of the first hole 41/2" from the bottom edge, then lay out the remaining holes on 41/2" centres. The top hole should finish 2" away from the top edge. Repeat on the right side, starting from the top of the rack.
- Angle your drill press table to 20° and install a 11/4" spade bit. Clamp a fence to your drill press table so repositioning the rack for each hole is simple. Drill the holes on both sides. (Photo 2)
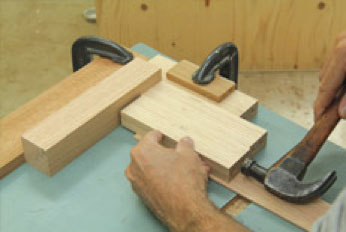
Photo 2 Easy angles
Tilt your drill press table to 20°, clamp a simple fence to it, and you're ready to drill the holes that will hold the neck of the wine bottles. - Rout a profile on the front corners of the rack.
- Replicate wear in natural places by adding texture with chisels, screwdrivers, hammers, awls, files, sandpaper, chains, rocks, etc. Start with corners. When in doubt stop - you can always add more. (Photos 3 and 4)
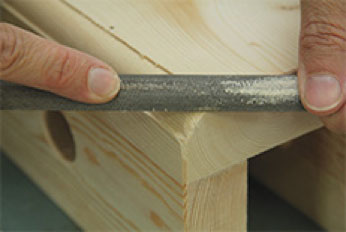
Photo 3 Start with the corners
Wear naturally occurs on the corners of furniture first. You don't need much wear to make it look authentic.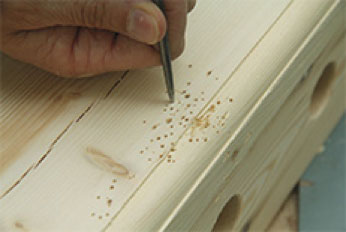
Photo 4 Get creative
Use a small awl to mimic insect damage. Get creative with the tools you use to add wear - rocks, hammers, and handsaws all work well. - Sand the rack to remove any large burrs.
- Apply a SamaN® Stain colour of your choice. (Prune is shown)
- When dry, add more wear through the stain with course sandpaper or other tools. (Photo 5)

Photo 5 Lighten the colour
After the finish has been applied, use a file or sandpaper to remove some of the stain from high-wear areas. This is an important step, but don't go overboard. - Apply the topcoat.
- Mount the cleat to a stud and fasten the rack to the cleat. Use brown exterior screws or regular zinc screws, depending on your choice of stain colour.
Rob Brown designs and builds custom furniture, and is editor of Canadian Woodworking and Home Improvement magazine.